Thursday, September 25, 2014

The SR Eyepiece Reconsidered

The SR eyepieces for this comparison.
Left to right, the Meade tall .965" 4mm "SR", the Meade
.965" short 4mm SR, and the Celestron 1 1/4":4mm (5mm) SR.
Recently, I came across a rather harsh thorough review of the Celestron FirstScope 76mm table top Newtonian. While I did not necessarily agree with all of the author's findings, one item stood out; he rated the 4mm SR included in the telescope rather highly. 
SR eyepieces have not been generally appreciated in my experience. They have very poor eye relief, the images are frequently dark and murky, the view is narrow. Most of my SR eyepieces have ended up either in the spares box or the parts bin. To be honest, based upon my experience with smaller SR eyepieces, I simply did a cursory test of the Celestron 4mm model, and it too ended up in spares.
Perhaps I should have tried it again. Most of my astronomy has been solar, deep sky (clusters primarily), and lunar, with a smattering of planetary work. I tend to use optically friendlier eyepieces, in my case a number of Kellners and a Plossl or two. Higher magnifications have seldom been used. The SR eyepieces have been there if I needed them. I seldom have.
Let us look for a moment at what an SR eyepiece technically is. I've come across several definitions for "SR"; "symmetrical Ramsden", "super Ramsden", "achromatic Ramsden", and simply "symmetrical". The classic Ramsden design consists of two plano convex lenses. For the unfamiliar, plano convex are flat on one side, convex on the other. In the Ramsden design, the flat sides face "out", with the field lens (forward) larger in diameter and with a longer focal length than the eye lens (rear), with a space between them. There is a specific formula for this, but for now we'll simply deal with the design's geometry. 
As it turns out, while most of those definitions are probably incorrect; they are certainly "symmetrical" in some sense, but have very little else in common with the "Ramsden" design aside from having two elements. 
To that end, I decided to take apart each of my SR eyepieces to study their construction. By the way, this is not something I recommend doing. It is very easy to to get dust on the lenses, and when dealing with such small focal lengths the result is dreadful.
The 1 1/4" Celestron 4mm SR, which actually yields a focal length closer to 5mm (as initially confirmed in the linked article), appears to have two symmetrical convex lenses of similar diameter.


The field lens looks identical to the eye lens, but may have a slightly longer focal length. Beyond that, this eyepiece has more in common with what was once called the continental variant of the even older Huygens eyepiece Both lenses are double convex. The only exception is how similar the lenses are to one another. 
How then does the 1 1/4" Celestron 4mm (5mm) SR compare in design to a smaller .965" version?
Currently I have two that are still intact and in use, and both were imported by Meade at various times. Externally, they look different, with one being longer.


I decided to open the shorter one up first. Again, I was greeted with two lenses, but much smaller in diameter than those found in the newer Celestron 1 1/4" design. They can only be described as tiny, around 3.5mm in diameter a piece. Like the Celestron lenses, both were double convex, and again the field lens apparently had a slightly longer focal length. But again, they were extremely small. This will explain much, as you will read later.


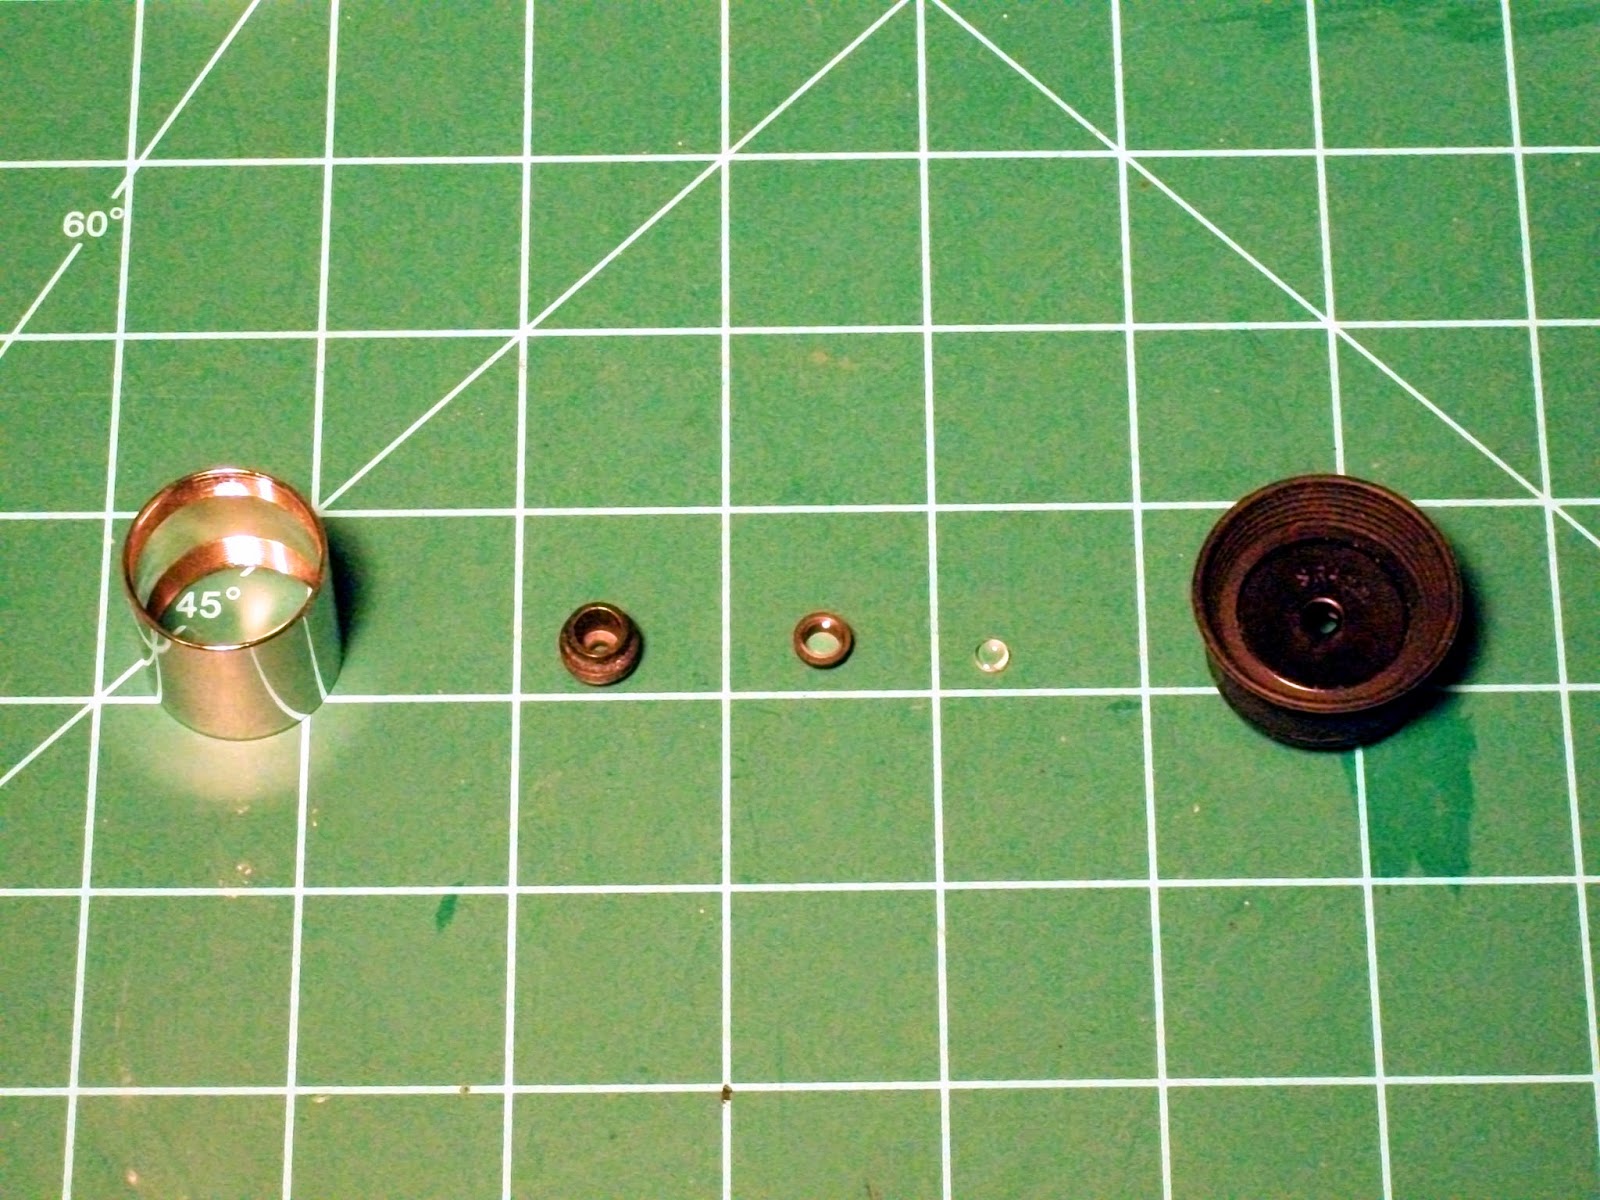
How about the taller .965" Meade 4mm SR? One thing that stands out immediately is the diameter of the field lens opening. It is close to twice the diameter of the one found on the smaller SR. In construction, however, there is a big difference. When opened, there is another lens.


Ahead of the field lens is a double concave. In effect, this forward lens serves as a built in Barlow, increasing the magnification. Otherwise, the construction of this SR is almost the same, though using larger lenses than the ones found in the shorter .965" SR. The spacing between the field and eye lense, however, is rather close, being more akin to simplified symmetrical eyepiece.
Optically, how do they compare?
For the test, I used my 60mm f/7.5 refractor "Bianca" and chose the top of a nearby pine as a target. 
As expected, the Celestron model provided a nice, bright image that was fairly crisp, though typical with the design the eye relief was a little poor. The shorter Meade SR, with its small lenses, had a narrower view and poorer eye relief. The view was adequate, with a slight discoloration at the edges. For stellar work, this is fine, provided the target is centered.
I was not quite sure how the taller faux SR would compare, as I had never really used it. I expected it to be somewhat darker, as smaller, simpler Barlow lenses tend to produce that. Not surprisingly, it was indeed darker and narrower than the Celestron version, though the eye relief was better. It makes one wonder how would this eyepiece behave without the Barlow? Would it create an 8mm eyepiece of some sort?
This little test proved that sometimes judging an eyepiece by its designation is tricky. SR eyepieces, regardless of what SR really means, are a mixed bag. The newer, cheaper, smaller .965" are iffy at best, while the larger 1 1/4" Celestron model is a fairly decent performer. The only real test is with the individual. The older .965" standard is fading, and chances are likely that the only time you'll encounter them is on older equipment, or very inexpensive equipment. It is probably best to err on the side of caution and go with the better performer. In this case, that would be the Celestron. Just remember, it is closer to 5mm than 4mm.

Sunday, June 15, 2014

Solar Astronomy, My Way

Bianca, my current choice for observing the Sun
In this digital age, we have become perhaps too reliant on things being available to us in an instant. I'm as guilty as anyone else in that regard; I have scanners and digital cameras and all sorts of image processing software, as well as specialized (albeit lower tech) video gear for my telescopes. 
Yet here I am, everyday before noon if possible, setting up my old 60mm, 450mm FL telescope "Bianca", complete with solar filter and 9mm Kellner eyepiece, to study, and sketch, the Sun.

The business end. My old scratch built Baader film solar filter.
The goals here are multiple. Chief among them is the simple task of improving my observation skills. When you set out to draw something, you it pay a lot of attention. True, I can be remarkably fastidious when it comes to noting small details. Doing so when the subject is in the night sky, and being observed directly, is another matter entirely.
The other goal is to improve my ability to record the information. Currently, I have three astronomical journals. The first is for written record. The second and third are for the visual recording of observations, with the second being specifically for solar observations. 
This is my so called "Green Book".
All of my journals are simple composition books, but numbers two and three are graph ruled, 5mm to the square. I use an old COX (an office supply company from Taiwan) compass for drawing my solar disk, and have set a standard radius of 76mm (3 inches) inside the front. I also do my best to ensure that the circles are all set in the exact same position on each page.


I did say I could be fastidious.
After each observation, I compare my data to the information at SpaceWeather.com. This is to double check on my alignment and number of spots observed. I miss some, make no mistake, but keep my observations true; no corrections are made.
Since early April, I have been keeping a steady log of the Sun. To date (15th June, 2014), I have recorded forty four complete observations. I hope to fill this journal by year's end, weather permitting.
Again, this isn't to say that using digital methods is bad and that I am a Luddite of sorts. Far from it. The idea here is to improve my ability as an observer. When it comes to astronomy, that is something we should all strive for.

Wednesday, June 04, 2014

Just A Little Note About Eyepieces

There's no substituting good eyepieces.
Aside from being a somewhat awkwardly phrased sentence, it is an utter truth. At a minimum, you need three eyepieces for any telescope. Years of practice, experience, and standing on the shoulders of giants has taught me that.
Traditionally, and for a very long time, most telescopes came with Huygenian eyepieces. These simple, two element eyepieces are just okay, and not much better. Their biggest problem is eye relief, making viewing through them a less than desirable experience. I use them, to be honest, but I don't really recommend them. The lowest quality eyepiece I recommend is a Kellner. Think of this as an evolved Huygenian eyepiece with better eye relief and a much better field of view. Next up the ladder, and still very affordable, are Plossls. From there, you start to climb somewhat in expense and complexity, almost always corresponding with better viewing.
Yet I still use cheap eyepieces and accessories. Why?
I don't know, perhaps I'm lazy.
Here I am, in Charlotte Hall, Maryland, and the one eyepiece I choose to bring is a 9mm Kellner. This isn't so bad, but I've chosen to couple it with an inexpensive 2x Barlow, one that appears to be a single element, a lone plano-concave lens.
And it is not quite okay.
For stellar work, it seems to be okay, though just slightly. However, for planetary work (and right now, the evening sky is blessed with three planets to choose from), it fails miserably, at least in combination with my old Monolux 60mm F7.5 "Bianca".
The lesson here?
I have a much better Orion 2x Barlow. Use it.
Live and learn.
After all, there is no substituting good eyepieces.

Monday, April 14, 2014

The Blood Red Moon & The Tetrad

The total lunar eclipse of 20-21 February, 2008,
as seen from one of my CCTV cameras.
The Moon is just entering the umbra. 
Before the sun rises on Tuesday, the 15th of April, 2014, the Moon will have gone through the first of four total lunar eclipses that will be visible from the Americas. There is a lot of confusion arising from this, apparently, and some misinformation floating about.
After all, it's not like total lunar eclipses are very rare events. But first, let's talk about the actual eclipse itself. 
For those of us on the east coast, the eclipse begins at 1:20 AM EDT, according to the folks at "Sky &; Telescope". Other sources list this time as closer to 2:00 AM EDT. Regardless, this is the penumbra portion of the eclipse, and for the most part is barely noticeable. The Moon really begins to darken at 1:58 AM EDT; this is the beginning of the real eclipse. Slowly, the Moon will continue to move eastward in our sky (contrary to the direction the sky's moving, in fact, and with the Earth's rotation), until 3:47 AM EDT, when it will be mid-eclipse, deep within the umbra portion of the Earth's shadow. But it is not going to be dead center in our shadow; it will be off and towards the south. This should be manifest in a southern section of the lunar disk that is brighter, the variable being cloud cover on our planet, which effects the light that shines around the edge of our planet. This light is being lensed through our atmosphere. If the Earth did not have an atmosphere, a lunar eclipse would in fact be total as long as it passed through the Earth umbra. 
The total portion of the eclipse ends at 4:25 AM EDT, as the Moon begins exiting the umbra portion of the Earth's shadow and begins getting brighter. The final partial portion of the eclipse ends for us here on the east coast at 5:33 AM EDT (earlier for us here in New England; due to the fact that we are further east, the Moon will be setting, and the Sun rising, of course). For our friends just a little further west, the entire eclipse will be visible. For the most part, though, both North and South America will see a total eclipse, for again as I mentioned, the penumbra eclipse really isn't that noticeable.
Now on to the bad information that's floating around.

Eclipse visibility chart from the
Wikipedia entry for the 15th April 2014 lunar eclipse.
(Image couresy Wikipedia)
First, unlike a solar eclipse, it doesn't matter where you are during a lunar eclipse. From Boston, you will see the same part of the eclipse as Buenos Aires. This is because we are looking at the shadow being cast, not from it. 
Second, there is no guarantee that the Moon will turn just "blood red". There is a good chance that it will, but remember what I mentioned up there; the real variable is going to be cloud cover around the Earth's atmosphere. The more clouds, the more likely it will be darker. The fewer, the brighter. In short, it could go from blood red to dark chocolate. 
Finally, there is much ado about this eclipse and the "tetrad" that it marks the beginning of. A "tetrad" in this case refers to a series of four lunar eclipses spaces at six month intervals. Usually, it is not uncommon for there to be three lunar eclipses over a one year period. This tends to be the most common pattern, a "triple". Tetrads are not as rare as it would seem, in fact. The last tetrad occurred in 2003-2004 (not quite eleven years ago). What's unusual about this tetrad is that it will be visible from the Americas. 
So, what does this mean?
Nothing.
Absolutely nothing.
There are people who are desperately looking for some sort of meaning in this, yet in reality one does not exist. Have historic events occurred near or around these events? Certainly; after all, really triples, tetrads and just good old lunar eclipses are not that uncommon. As one of my high school teachers used to say "correlation does not equal causation". In other words, they are coincidences, and nothing more. We seek answers, we look for them hard enough and think we see patterns. It is our desire to find those patterns that actually produces them. 
If you get a chance, try and stay up late to catch this wondrous event. For my friends further west, you won't need to stay up nearly so late. For us here in the east, it looks like an all nighter.
And sadly, it's looking increasingly like a no-go here in Connecticut. Clouds are rolling in, and the rain is coming. 
We'll see.

Saturday, April 12, 2014

Solar "Reflections", Part 2

As the warmer weather gets underway here in New England, I turn my attention to more things astronomical. For the first time in weeks, I no longer fear being exposed to bitter cold. While there may be plenty to do at night, I have turned my attention to solar astronomy. 
As mentioned on my entry for the 1st of this month ("Solar "Reflections""), I decided to play with an alternate method of viewing the Sun, and the initial results showed promise. One thing I failed to mention with regards to these recent attempts is that on the 29th of January of this year, there was an chance alignment that produced a solar image on the wall between the foyer and the half bathroom. It wasn't the sharpest of images, but was clearly the Sun.


I decided to make a "screen" (a cardboard box top) to see what type of image could be gleaned. 


It turned out the the source was light coming through the kitchen window and passing between the freezer and refrigerator doors and handles. 


It wasn't much of a pinhole, but it was just enough to produce an image. It was just sharp enough for me to make a simple animation of the Sun heading down.


Now on to the current work.
After my initial foray into pinpoint reflection this month I decided to try again, but this time setting going even further. Additionally, I made a dedicated solar filter and Hartmann mask for my Celestron FirstScope, and have been undertaking a series of observations with that as well. But I wanted to see to what limits pinpoint reflection could be taken. 


As I had already set up for my daily solar session, I felt that it was also the best time to try for a projection into the house. With the Sun at such a high angle, it was guaranteed to be much brighter, and therefore able to provide that much more contrast. It was almost 13:00 EDT, and the Sun rode high.
I chose to set up, as I had before, on the back porch, taking advantage of the recently unpacked table to mount the pinpoint mirror. As I mentioned in the previous piece, this is a small fragment of a first surface mirror, but what is important to note is the size; not quite 5 mm square. In my first attempts back in the autumn of 2013, I had reduced that area to a point 3 mm in diameter. Since then, the paint has come off. While we may have lost some detail, we gained contrast. 


I set up my drawing pad and easel on the dining room table. Total distance between the mirror and the paper was perhaps 9 meters (30 feet). The resulting image was around 125 mm (5 inches), but a measurement wasn't taken. The solar disk showed, but didn't provide enough detail.


For my second attempt, I slowed my camera's shutter speed. This allowed for a little more contrast. Something began to show up. The third attempt was pretty much the same.


It was at this point that I decided that what was really needed was more distance between the mirror and the screen. I chose to go another 2.4 meters (8 feet). This resulted in the easel being set up straddling the kitchen sink. Here, the details started to become a little clearer. Sunspots were beginning to become visible. 


After adjusting the the image's contrast and light levels, the sunspots in the Sun's northern hemisphere became very visible. The small group coming around the Sun's western limb was even there, albeit faintly. 

North is to the left in the projected images.

Compare this to the official Space Weather image for today.


By this time, high altitude clouds began making rolling in, so I put away my gear and waited. 
At a few minutes before 16:00 EDT, I decided to go even further afield, this time into the yard beyond the porch.


My "screen" was taped to the wall in the living room. Overall distance was now about 18 meters (60 feet). The projected image was around 200 mm (8 inches). There were still some high altitude clouds, but not as bad. Not surprisingly, some work with the image still needed to be done. While some of the contrast was lost, after the image was worked, the sunspots once again showed very clearly. They were, however, noticeable to the naked eye.


Perhaps what is really needed is a lot of distance and a very dark room into which the image is projected. No doubt larger sunspots would show even better. 
Still, I think we can call this little experiment a success. If anything, it was fun.

Tuesday, April 01, 2014

Solar "Reflections"

1st April, 2014. 
Today was the first really nice day we've had since November. The temperatures weren't terribly high still, just 49° F (9° C), but in the sunlight, it feels so much better than the winter we've had. It was also remarkably clear today, with that wonderful Sun shining like mad up there in that sapphire sky.
In other words, it was a perfect day for solar astronomy and a little experimentation. 
Back in early fall of 2013, I took a small chunk of broken first surface mirror I had and attached it to a piece of cardboard, and played around with solar pinhole mirror projection. This is the opposite of regular pinhole projection, since there is no hole, instead just a very small reflective source. My test last year weren't perfect, but they showed that yes, a solar disk could be projected. The problem was that I was projecting the image onto a screen outside, where it was too bright. 
For today's experiment, I chose to cast the reflection into the condominium, and with much better results. 
The mirror and its base were taped onto the head of one of my tripods, in a manner that allowed it to be easily aimed (much like a camera, in fact). 


The tripod was then carried outside onto the back porch. It was shortly before noon, and the Sun was fast approaching the meridian. It took a little work to get it aimed. I chose a spot on the dining room wall, next to the large decorative clock that hangs there. This allowed for an image that was a little over 5" (125 mm) across). This was perhaps 25 feet (8 meters) from the mirror. 


It worked, though the resulting image was not as sharp as I would have liked. 


This is the trade off. You can choose sharpness over contrast, making the pinhole (or in this case the reflective surface) smaller. The resulting image would be darker, however. For today's experiment, I chose contrast over detail. 
Amazingly, after the images were pulled and processed, I was surprised to discover that the largest patch of sunspots on the main disk, group 2021, was faintly visible in the image. A little sharpening, and you can sort of pick them out. 

In this projection of the Sun, north is to the left.
The Sun, 1st April 2014, courtesy Spaceweather.com
Certainly, the method can be improved, but it is severely limited. You will never have the acuity that a lens system will provide. As a safer method for observing things like eclipses, transits and larger sunspots, this method should be sufficient.
I do wonder to what extreme it could be taken. Maybe that will be a "project" for the future. 

Wednesday, September 11, 2013

A Diagonal For The Galileoscope


The Galileoscope has become one of my favorite experiment telescopes. I should explain what I mean by "experiment". I use this telescope for things like video imaging, solar work, testing eyepieces, etc. But it is more than just a test telescope. It can be used for some observing work. 
The chief complaint about the telescope, though, is the lack of a star diagonal. If the telescope is raised higher than 35° from horizontal, it begins to become difficult to use, especially is you use a shorter tripod. Unless the average Galileoscope user has access to a taller tripod, the only real objects are those that are closer to the horizon.
Adding a star diagonal to the Galileoscope is tricky. The draw tube focus is very limited. Adding a diagonal is not practical without modifications. There are a few eyepieces that can be used, but very few. 
Some users have modified the telescope to take a focuser. To me, that just doesn't seem very practical. In order to add a focuser, the tube has to be cut, and the last thing I want to do is weaken the tube's structural integrity. This is also something that the average Galileoscope user might not want to do, and almost everything I do I want others to be able to. 
The simplest solution is installing a transit lens. Some users have used Barlow lenses, but they add length and therefore more magnification. The trick here is to increase the focal length just enough to make using a star diagonal practical. 
The lens I used was a 29mm plano concave (PCV) with a -53mm focal length. This is actually leftover from my Galilean project. I placed this ahead of the diagonal and used the Galileoscope's 20mm Plossl. This makes it close enough to not increase magnification too much, the result being roughly 1.5x to 2x. The target for the first full test was a waxing crescent Moon, and the results were very good. The amount of focus play is sufficient to allow the use of additional eyepieces. 
The diagonal I used was a heavy 1 1/4" older Meade, which was tricky. At higher angles, the weight of the diagonal kept pulling the draw tube focuser out. A couple of times, the star diagonal nearly fell out. The solution would be to use a plastic diagonal. Surplus Shed and other outlets sell inexpensive units that should be much lighter. 


There is still some tweaking that needs to be done, however this simple modification greatly improves the usability of this telescope. When the tweaks are made, they will be posted here.

Friday, August 09, 2013

The Perseids Peak

The Perseids have been upon us now for a few weeks, and are due to peek this weekend, the nights of the 10th through 12th. The shower itself actually runs for a few weeks, starting usually the second week in July and then running through the third week in August. The peak is always near the second week of August.
Like most meteor showers, the Perseids are associated with another larger body, in this case Comet Swift-Tuttle. This comet last paid a visit to the inner Solar System in late 1992, and has since been heading back into the depths of space. 

Chart courtesy The International Astronomical Union Minor Planet Center
With an orbit that takes it out to a distance further than Uranus, Swift-Tuttle takes a leisurely 133 years to make a complete loop around. Its orbit, however, is steep compared to most of the planets.


The Perseids are the debris that Comet Swift-Tuttle left behind. This material spreads out along the comet's path, and starting in mid-July, the Earth begins encountering it. For the following few weeks, our planet passes through that path, and in doing so we get the Perseids.
In order to catch these little pieces of cometary debris, you need to stay up a little late, at least until after midnight local time. Look towards the northeast; after midnight, the constellation Perseus will begin rising over the horizon, and it is here that the meteor shower's "radiant" is found. If you follow the path of all the Perseid meteors, they should point roughly back towards this, even though they could be anywhere in the sky. This is also roughly the direction the Earth is moving. In a sense, the Perseids are akin to bugs on our planetary windshield.

Chart created with Home Planet
So, if you get a chance, try to stay up late and catch these little remnants of a comet that won't be in our part of the Solar System for another one hundred and thirteen years.

Wednesday, August 07, 2013

The Smaller Telescope, Pt. IV - Examples of Current Smaller Telescopes

There are plenty of small telescopes out there, but the buyer needs to beware; too many of them are really not good telescopes at all. It's not optics alone that make a telescope. There are two other items that need to be as important; the mount and the accessories, namely the eyepieces.
One of the most common telescopes is the 50mm. If you go to eBay, you will find hundreds of them, with a solid proportion of them being sold with the flimsiest of mounts. Even the big names, like Meade or Celestron, have been known to drop the occasional bomb.
What follows is based upon personal experience. 

  • Meade Jupiter Series 50mm - 

This telescope has been out of production for a few years, but there are still plenty of them around. Like most 50mm, its primary lens was just fine. The problems arise when we move beyond the telescope. The first big problem was the tripod. It was somewhat wobbly. Since the telescope had a threaded mount, one would expect that you could simply replace the tripod. That is where we make the discovery that not only is the mount "stepped', it isn't a standard 1/4"-20 thread, but something close. The diagonal and eyepieces were .965" standard. These days, I keep an open mind, as there are good .965" eyepieces available. These were marginal at best. You could purchase a hybrid diagonal and move to the more common 1 1/4" size for eyepieces, but then the problem with the tripod still exists. I did not keep the telescope long.
Conclusion - wasted potential.

  • Meade 60mm AZ-T - 

Another one from Meade, and again also out of production. This telescope is a short tube tabletop model. It has quite a bit of plastic, but is not that bad a little instrument. It comes with an erect image diagonal, two 1 1/4" eyepieces (a 20mm Kellner, and a 9mm MA; mine had a 17.5mm MA instead of the 9mm!), a Barlow and a tabletop tripod with standard 1/4"-20 threads.  Sold with a handy carrying case. This is one of my favorite telescopes. Some people have complained about the focuser, but I've not noted any difficulties with mine. A great little "grab-n-go" telescope, it provides really nice views. The included Barlow was the only fault I could find with this telescope. I normally mount this on a heavier, and taller, tripod. I have managed to get a fair chunk of Messier's list with this telescope, even with the modest 17.5x magnification the 20mm Kellner provides. These are still to be found online at reasonable prices, and is recommended.

  • Galileoscope - 
This is the much vaunted 50mm educational telescope. When you purchase it, you are provided with just a telescope, and its accessories, all of which you assemble. The main eyepiece is a 20mm Plössl-type design, which for having plastic lenses provides very nice images. The other eyepiece is a Galilean, that is to say, a single concave lens, which also serves as the base for the 2x Barlow. Both are 1 1/4". When this telescope was announced, the initial plans was for it to cost $15 USD. It has now more than doubled, but is it worth it?

In my opinion - possibly. As an educational tool, it's great. It provides the student with hands on experience of how refractor telescopes work in their most basic form. The telescope comes equipped with a 1/4"-20 thread mount (really, a nut which is held into place in the lower part of the optic tube), so commercial tripods can be used. The Galilean eyepiece allows the student to see the sky the way Galileo did. However, there are downsides to the design as well. The optic design is straight-through; it cannot take diagonals. Well, it can, but the resulting focus range is very tight, depending upon the diagonal used. So, the telescope needs a fairly high mount; most recommend a tripod that can extend to 60" (1.524 m), as well as a chair or seat of some sort to make viewing higher objects easier. Objects that are closer to zenith, though, will be extremely difficult. 
Optically, it is a nice telescope. As stated previously, the 20mm Plössl gives good view when combined with the 50mm primary, I've used other eyepieces, and objects closer to the horizon, and feel that the telescope works fine.
Recommended with caveats.

  • Celestron FirstScope 76mm "baby Dobsonian" - 

I purchased this telescope in the spring of 2013, and am really surprised by its performance. It is a small Newtonian in a one armed Dobsonian mount, comes with 1 1/4" eyepieces, and is one of the easiest telescopes to work with right out of the box; open it up, set it on, say, a picnic table, remove the focuser and dust cover, pop in an eyepiece, and you're set. 
It does have weaknesses. For one, the included eyepieces are not the best. Of the two, the 20mm MA is the more serviceable, while the 4mm Huyghens is really not that great at all. Lack of a finder scope might bother some people. The primary mirror cannot be collimated (adjusted). 
But, how does it perform?
Ignoring the 4mm  eyepiece, with the 20mm MA it performs fine. The focal length of the telescope is 300mm, so it is a true short tube Newtonian, and operates better at low power. Still, moving over to one of my other eyepieces (a 10mm MA) revealed a great image of the Moon. 
My recommendation - probably one of the better beginner telescopes out there (along with the very similar Orion FunScope, based upon reviews and comparisons written elsewhere). Just purchase some additional eyepieces, maybe a finder scope, and you should be set.

To close, just a thought. Occasionally, you can find cheap telescopes at thrift stores and yard/tag sales. If the price is low enough, don't be afraid to purchase the instrument and give it a shot. There are always diamonds in the rough. Just keep in mind that some work might be needed, but the process of making those improvements simply add to learning more about this wonderful endeavor we call astronomy, If, in the end, the instrument is still found wanting, at least that can be said.

Thursday, August 01, 2013

The Smaller Telescope, Pt. III - Resouces

A few of my resources, and perhaps the least I need many times.
As mentioned in part II, this part we are going to look at how some of the resources available for binocular astronomy can be applied to the smaller telescope. 
Elsewhere in this blog, I've mentioned Garrett Serviss and his pioneering "Astronomy With An Opera Glass", perhaps the first book written on the subject of small instrument astronomy. Not only was it pioneering, but it was also practical; Serviss spent very little time reflecting on the instruments themselves, instead choosing to concentrate on observations. Many of the books on binocular astronomy today are split between both, covering the tools and the trade, if you will. But Serviss' book laid out the format that many still follow. For the smaller telescope enthusiast, the technical aspects of working with binoculars are of no use. Instead, you need to look at the observing section. 
There are, of course, still plenty of star guides that will be of use. 
In my personal library, one of the best books to guide us along is the late Sir Patrick Moore's "Exploring The Night Sky With Binoculars". Once you get past the first two chapters, which, not surprisingly, deal with the instruments, you find page upon page of targets to choose from. Chapter three, for instance, deals with many of the basics of stargazing, covering subjects such as the Greek alphabet (which is crucial in the identification of stars, as well as explaining how color is an indicator of temperature. After that comes chapters covering a variety of targets, from individual stars to clusters, nebulae, constellations and even some of the brighter galaxies. Near the end of the book he covers observing the Moon.
Another handy book is "Binocular Stargazing" by Mike Reynolds. I will admit, I've had a personal hand in the creation of this book; I helped to do some of the illustrations. But like Moore's book, it covers the equipment aspects first, and then dives into observations. After covering lunar and solar observing, the book then goes into how one can use binoculars for observing some of our planetary neighborhood. There are sections that cover the sky by season as well. One feature I like about this book are that many of the finder charts are drawn within circles, fairly close to what one should see when looking through binoculars or a telescope.Or
There is a book that deals with the Moon alone, and covers both binocular and telescopic observations. Originally written in the 1960's, Ernest Cherrington, Jr.'s "Exploring the Moon Through Binoculars and Small Telescopes" covers the lunar surface features in a bit more detail than the previously mentioned books, and therefore is of more utility. While no longer in print, the splendid Dover edition can still be found in abundance.
You will need star charts as well. There are perhaps dozens, if not hundreds, of sources here. Many of the basic books by Sir Patrick Moore, Ian Ridpath, Wil Tirion et al are more than sufficient, but there is an online source that I've found so useful, I've printed them off and had them laminated. These are Tashimi Taki's star charts, found here. These charts have proven invaluable to me. While they do cover deep sky objects down to 11th magnitude, the stars go down to magnitude 6.5, allowing them to serve as guides in the pursuit of more distant quarry.
This is just a start, and here based upon personal experience. Just remember that when deling with smaller telescopes that they will not reveal the heavens like much larger instruments. But they will open your eyes, are easy to use, and are a great starting place.
Next time, we will look at some of my instruments as case studies, as well as discuss what can be had, what to look for, and what to avoid.

Wednesday, July 31, 2013

DIY Neutral Density & Lunar Eyepiece Filters


This isn't the first time I've used this little trick, but since I needed to make a few more filters for some upcoming solar observations, I thought I'd share.
You know those disposable sunglasses you get after an eye exam? They are an excellent source for neutral density filters, if they are simple dark tinted, or lunar filters if they have a brown tint. Simply cut out 1 1/4" (a little less than 32mm) disks from the material. They have the potential to supply up to six disks, which is more than adequate for most amateur astronomers. They can always be layered to add more filtration as needed. The way you use them is to put them ahead of the eyepiece if you have a diagonal. If you are using a telescope that doesn't use diagonals, say a reflector, you may need to do a little engineering, perhaps making a hood that attaches over the back of the eyepiece, putting the filter between the eye and the optics.
They help to tone down the Moon for lunar observations, and can be used in conjunction with solar filters to provide additional contrast (NEVER use these filters alone for observing the Sun, even layered. Always use proper solar filtration).
So, next eye exam, don't toss these little disposable sunglasses, add them to your astronomical tool kit.

Monday, July 29, 2013

The Smaller Telescope, Pt. II - Capabilities

Can this little instrument see galaxies and nebula? Read on.
Let's look at what a small telescope is capable of.
Most of the work done in the early days of telescopic astronomy was done with instruments of small aperture. Even when those instruments had fairly large apertures, the optics of the time usually left a lot to be desired. The modest, low end instruments we find today are at the least their peers, and more likely their superiors.
A telescope really does two things; it magnifies, and it catches light. Many novices get drawn in by magnification without consideration to the telescopes aperture, its diameter. There is a good rule of thumb when dealing with telescopes and their recommended top end magnification. Take the telescope's aperture in milllimeters and multiply it by two. Simply put, a 60mm telescope should be able to handle up to 120x maginification easily. Yes, you could push beyond that, but the images will become very murky and dark. 
The other things telescopes do is capture light and concentrate it back to the viewer. Many astronomers, amateur and otherwise, refer to telescopes as "light buckets". A better description might be "light funnel". A telescope takes the light and concentrates it. 
Not a light bucket, but a light funnel, that concentrates light back to the eye.

The larger the funnel, the more light it can concentrate. This means you are able to see fainter objects.
Of course, the more they will cost as well.
Let's look at what some smaller telescopes are capable of, using the online "Telescope Limiting Magnitude Calculator". "Limiting magnitude" refers to how faint an object the telescope can see with the conditions and parameters set out in the calculations.
The parameters I'm going to lay out here are for typical deep suburban conditions, using my middle aged (currently 50 year old) eyes. I'm also going to include telescope apertures that aren't that common, the two smallest ones. Let's assume that we are on the edge of civilization, the outskirts of a suburban area, with naked eye magnitude near 4.5, which while not terribly bright is not terribly dark either. On all of these apertures, we are assuming a modest 25x magnification. To give you an idea of what the telescope should be able to see, we are using the Messier object list at Wikipedia, compiled in the 18th and 19th centuries by Charles Messier and his assistant Pierre Méchain. This is considered one of the most important lists in astronomy, and is something of a stepping stone for amateur astronomers. Using the aforementioned, we arrive at the following results -  

  • A 30mm telescope can see down to magnitude 9.8. This is theoretically capable of viewing 74 of the 103 objects on Messier's list.
  • A 40mm telescope can obtain 10.1 magnitude. This means we can view 80 Messier objects.
  • A 50mm, a common size, should be capable of viewing down to 10.3 magnitude. We are up to 81 Messier objects.
  • The 60mm telescope, one of the most common sizes, can view down to 10.5 magnitude. We are now up to 89 Messier objects.
  • We end with the 70mm telescope, the largest size we will deal with here, and still fairly common. We are at 10.6 magnitude, and we are should be able to view 89 to 91 Messier objects.

There is one telescope I want to touch on by itself, a nice little beginner's telescope from Celestron, the 76mm FirstScope. This is a baby Dobsonian. It is capable of reaching down to 10.7 magnitude at 25x. Considering its price, it is one of the best little telescopes one can buy.

For its price and aperture, the Celestron 76mm FirstScope is one of the more clever telescopes available.

Now that we have established what the smaller telescope can see, we'll next look at how to find these objects. We're going to use tools designed for binocular astronomy.

Saturday, July 27, 2013

The Smaller Telescope, Part I - In Defense of Smaller Telescopes

As an advocate for smaller telescopes, I frequently find myself trying to find better methods and procedures for the amateur and small telescope enthusiast. As I have grumbled many times, many amateur astronomers tend to put anything with an aperture less than 152mm (6 inches) into the category of toy, save for a few, high end exceptions. But as their light gathering capabilities are usually similar to these higher end smaller instruments, I find this a bit puzzling.
Instead of trying to find resources for smaller telescopes, perhaps a different approach is needed. That approach is to use resources and tools developed for binocular astronomy.
In short, binoculars are nothing more than small, twin telescopes, held together. They are all almost always low power, with 7x to 10x being perhaps the most common, regardless of aperture. Most books for binocular astronomy therefore tend to concentrate on objects that can be easily observed at lower powers, such as open clusters.
A small telescope, 70mm aperture or less, has two viewing advantages immediately. The first is, of course, magnification. With a modest assortment of eyepieces, one can choose their magnification, but normally they can have higher magnification than comparable binoculars. The other advantage is a steady mount. You can buy tripods and tripod adapters for binoculars, or other devices to steady the view. However, telescopes, even inexpensive ones, almost always include some sort of mount. 
The combination of magnification and steady mount makes a small telescope complimentary or preferable in many ways. When  combined with observer guides for binoculars, the small telescope enthusiast is now armed with the tools necessary to do a fair amount of observing. 
Perhaps most binocular astronomy guides should carry "and small telescope" in their titling.
Next, we will look at some of the best resources for the smaller telescope.

Friday, June 28, 2013

Thomas Harriot's Moon

Between 1609 and 1610, Englishmen Thomas Harriot produced a number of drawings of the Moon, as well as what is probably the first map of its surface as well. The instrument he used was a simple Dutch "trunke", a telescope, of what we generally refer to as "Galilean" in design.
That is, of course, a misnomer; Galileo did not invent this optical design, he refined it. Others proceeeded him, Hans Lippershey in particular, with Sacharias Jansen and Jacob Metius also playing significant roles. 
Yet it was Harriot who aimed a telescope skyward and recorded the results.
It is interesting when we compare his map of the Moon with a modern image.

One of Harriot's Moon maps, Courtesy The Science Museum, Kensington
My image of the full Moon, early morning of the 23rd June, 2013 (the so-called Super Moon)

While not as artistic as Galileo's drawings, it is nevertheless remarkable, and proof of what a small telescope is capable of revealing to the humble viewer.

Wednesday, June 19, 2013

Galileo, Scheiner, Sunspots & Saturn

I decided to work on my Galilean-Scheiner sunspot study by conducting a test of instruments with those old optical layouts. For this, I used my facsimile Galilean and my small Keplerian.


Someone replied not too long ago that looking through a long tube Galilean telescope was akin to looking through a straw. Nothing could be more frustratingly true, but from a projection standpoint, it works much better.

However, the question must be asked, which telescope did Galileo use? The long tube instruments are incapable of projecting a full Sun; they simply have too much magnification. 

Surely, he used a smaller instrument. It was obvious, though, that it could be done, and the result is simply a mirror image.
Christoph Scheiner, however, preferred the Keplerian telescope. The Keplerian design uses plano-convex lenses for both objective and eyepiece. Like the Galilean, it is a simple two element design, but it produces a much better field of view. The tradeoff is that the image is inverted, but for astronomical purposes, this really isn't a problem. Scheiner was an early proponent of this design, and perhaps to be credited for its greater acceptance.

As expected, the images produced by the Keplerian were brighter and much clearer.


In this case, the image needs to be rotated 180°. I've enhanced it somewhat to bring out some of the sunspots.


The final test will be the creation of a Galilean eyepiece for the small Keplerian telescope, and a projection made to see if that approximates the studies performed by Galileo. In the meantime, it is clear that Scheiner does deserve more recognition for his pioneering work.

Wave At Saturn Night!

Tonight is "Wave At Saturn Night". This showed up on my Facebook page yesterday. This is the first time I've seen or heard of it. Nor am I able to find it again. But it seems like such a fun idea. Silly, yes, but fun.
Holidays like this, though, will forever be moving ones; planets fail to appreciate our calendar and seldom tarry long in one place.
Tonight, Saturn is pretty close to zenith at sunset. with a waxing gibbous Moon to its east. The white moonlight should proved strong contrast to Saturn's yellowish hue. 
If you get the chance to, be sure to take a step outside and look for Saturn, that bright yellow star north and west of the Moon.


Addendum - It was Philip Astore, amateur astronomer and professional firefighter, who made the comment about looking through a straw. Anybody who loves astronomy is a friend in my book, but this fellow also has one of the toughest jobs in the world. Stay awesome, Philip.

Monday, June 17, 2013

First First Light - The Anniversary

A few entries back, I wrote about my first first light with my old Tasco 50mm. The date I included was wrong; it was actually the 14th, not the 18th. It was a Sunday night.
Anyway, to commemorate the event, on the night of the 14th, I decided to recreate that moment with my Tasco 50mm, same model I had back then. I used two of its original eyepieces, a 20 and 12.5mm, both Huygens, as well as a new 20mm MA. All three eyepieces are, of course, .965".As with that night, I chose to observe Saturn, as well as the Moon.


What a difference thirty years makes.
The Moon that night was near full. I knew back then from using my binoculars that the Moon isn't much fun to observe near full. For the 32nd anniversary session, it was waxing crescent, and glorious. In 1981, Saturn and Jupiter were near one another. in 2013, Saturn lies just east of Spica.

The sky over Jacksonville the night of the 14th June, 1981.
(Courtesy YourSky at Fourmilab)
The night sky over Jacksonville, 14 June, 2013.
And like then, the sense of wonder I felt, even with such a small instrument, was the same.
I simply love the heavens.

Such a fine little instrument. The tripod isn't original, but everything else is. I seldom use small telescopes with finder scopes, by the way.